


Unless noted, all photos by Chelsey Werth
Some people kick off the fall season with pumpkin-spice whatever, and then there’s me. I kick off the season by lighting a fire.
In our previous home, we had a wood-burning fireplace on the main floor, and as soon as the temperature dipped below sixty-five, a fire was perpetually glowing. I was looking forward to carrying on this tradition until we realized that the fireplace, the one in the infamous peach room, didn’t have a liner.
As it turns out, if you don’t have a liner, you run the risk of carbon monoxide and other dangerous combustible chemicals running down your chimney into your room. Even if the odds are small that this could happen, it’s 2020, people. I’m not going to test fate.

Photo by Raquel Benedict
Watching summer creep by (and anticipating a very LONG winter), we wanted to get the fireplace up and running as soon as possible. However, the cost of replacing the liner wasn’t an item we had budgeted for (but that’s a different post). Always problem-solving, we asked ourselves if there was a smarter, more sustainable solution. We wanted to learn more about converting the wood-burning fireplace to a natural gas fireplace.
Initially, I had my doubts about the whole idea of natural gas. I’m a purist when it comes to the act and look of wood-burning fires. Part of what I love about a fireplace is the ritual of building a fire and tending to it. Having a fire isn’t a passive activity, but one that takes work. Aesthetically, natural gas fireplaces aren’t my thing. I was concerned that the new fireplace would take away from the integrity of the house; the installation would stick out like a sore thumb against the rest of the decor.


After doing some research and crunching some numbers, we decided to switch to natural gas. Not only was the cost significantly lower than replacing the liner, but it also saved on heating costs, and we knew it would be safe and ventilated properly—a MUST if using natural gas anywhere in your home. If natural gas is the right choice for your family, ventilation and air quality are the things to keep top of mind. Always consult a licensed professional, which is what we promptly did after making our final decision to install a gas fireplace insert.
Luckily, our furnace is close to the fireplace, so installation took no time at all. A professional from Fireside Hearth & Home (based here in Minnesota!) came out and measured, and two weeks later, the new fireplace was here. It gave me so much peace of mind knowing we had professionals handling running the line, along with city inspectors who are required to check for proper hookups and ventilation before final installation. We were in great hands with the Fireside Hearth & Home team, and Joe and I are thrilled that we were able to save money by selecting a gas insert and will be saving on our heating bill this winter. Wow—I’m really adulting hard these days.
The ritual of starting a fire and tending to it that I’ve always loved? Yeah, I can live without it. It’s unbelievable to have a roaring fire at the push of a button. Sure, I miss the smells and crackling of a true fire, but with some creativity, I found that burning cedar incense completes the ambiance I loved so much about our wood-burning fireplace.
Any doubts I had about the fireplace’s appearance lessened after visiting the showrooms at Fireside Hearth & Home. We decided on the Escape Gas Fireplace Insert from Heat & Glo. The design wasn’t ultramodern or high-tech (what I had initially envisioned) but a complement to our new traditional atmosphere.

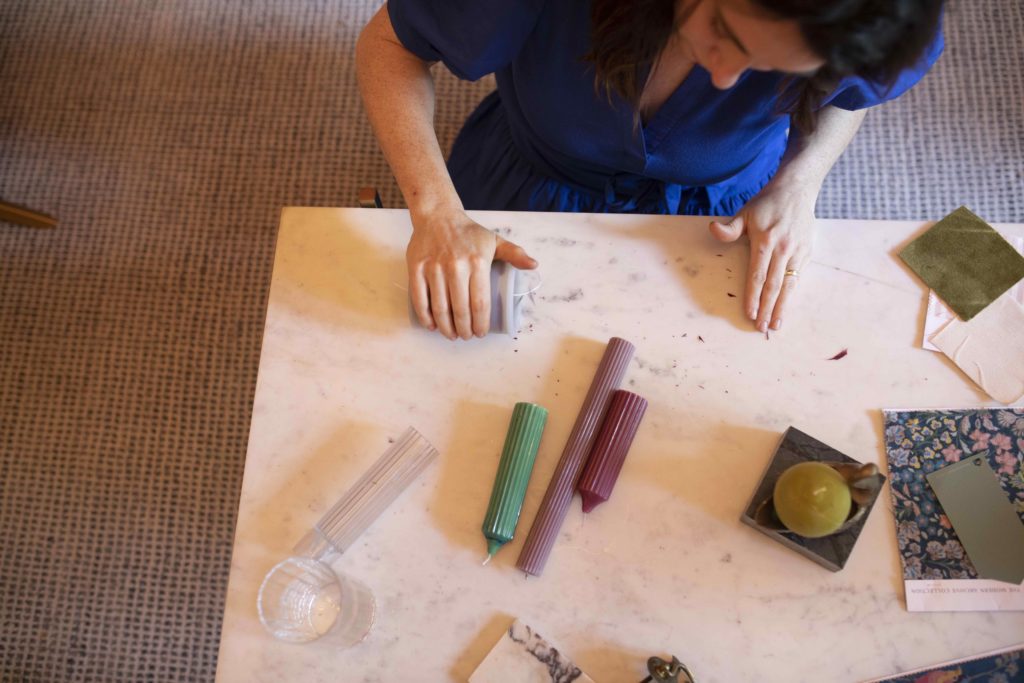
With the new gas fireplace insert installed, it was time to update the mantle. While moving in, the mantle became a place I would plop things I like without much thought, and it was becoming rather cluttered. While searching through our studio’s prop closet, I came across a trove of colored tapered candles. I was obsessed. I quickly burned through them, and I vowed to learn how to make them myself, in the colors I wanted.
Custom Colored Beeswax Tapered Candles:

Supplies:
- 4 different molds from Amazon
- 5 lbs. of beeswax
- Wicks
- Wax mold tack for sealing
- Wick holder
- Tin candle pourer
- Wax coloring dye
- Digital thermometer
Instructions:
1. Boil water in a pot large enough to hold your candle pour.
2. Place beeswax in a candle pour.
3. Double boil (never direct!!) your beeswax in the candle pour until it melts.

4. When the wax reaches 150 degrees, you’re ready to add the coloring solution. (The color formulas I used are below.)
- Whisk the wax thoroughly! I noticed little dots of pigment in my first few attempts in my candle that never entirely assimilated.
- Colors will dry lighter. I highly recommend either pouring a tiny bit of wax out to dry on parchment paper or tilting your wax pour slightly and letting the wax air dry to see a better representation of the final color.
5. Once you have your desired color, thread your wick through the mold.
6. While holding the wick, carefully pour the wax into the mold. Make sure the wax temperature is no lower than 120 degrees.

7. Use a toothpick or skewer to hold the wick out of the cooling wax.
8. Let the wax set and solidify. I put mine in the fridge for 1 hour.
9. To easily release the mold’s wax, put it in the freezer for 15 minutes after it solidifies. The wax will have contracted and you should be able to remove it quickly.
10. Trim your wick to about ¼ inch, and cut the bottom of your new candle to ensure it’s level.
Color Formulas:
- Pink: 2 drops of red and 2 squares of white coloring
- Violet: Use the pink wax formula and add a drop of blue
- Burnt Orange: Use 4 drops of orange, 2 drops of caramel, and a tiny sliver of green

- If your colors are too primary, consider adding white or brown to mute.
- If your color is too saturated, add more wax.
- Soy wax isn’t that great to work with; if you are using a mold, I recommend paraffin wax or beeswax.
I think next go-round, I’m going to try to layer the colors. My theory follows the same steps as above, but you let each layer harden before adding the next.
My recent thrifting hauls have yielded a ton of nontraditional, ad hoc candleholders. I’ve found that if I add a little bit of wax adhesive, candles stay secure in the vessels. The variety of short, tall, fat, and thin candles makes for a visual feast for the eyes.
While I’m not the most ardent fan of winter, I am looking forward to the cozy evenings, crackling hearth, and dancing flames in our favorite room.

Do you want to learn more about natural gas?
Look for your natural gas provider here.
Editor’s Note: This post was sponsored by Natural Gas Genius. The compensation we receive in exchange for placement on Wit & Delight is used to purchase props, hire a photographer, write/edit the blog post, and support the larger team behind Wit & Delight.
While compensation was received in exchange for coverage, all thoughts and opinions are always my own. Sponsored posts like these allow us to continue to develop dynamic unsponsored content. Thank you for supporting our partners!

Kate is the founder of Wit & Delight. She is currently learning how to play tennis and is forever testing the boundaries of her creative muscle. Follow her on Instagram at @witanddelight_.
BY Kate Arends - October 27, 2020
Most-read posts:

Did you know W&D now has a resource library of Printable Art, Templates, Freebies, and more?
take me there
Get Our Best W&D Resources
for designing a life well-lived


Thank you for being here. For being open to enjoying life’s simple pleasures and looking inward to understand yourself, your neighbors, and your fellow humans! I’m looking forward to chatting with you.
Hi, I'm Kate. Welcome to my happy place.


I was thinking of doing these candles as Christmas presents and would love links to all the products, specifically the molds and the candle dye! So so gorgeous
You got it! These are the links I have on hand at the moment. Let me know if you have any other questions!
Mold 1
Mold 2
Candle Dyes
Beeswax
I too love taking money from the fossil fuel industry!
Nothing says “I i love fossil fuels” and a big FU to the planet than a paid advertisement by the gas lobby.