


Making art can be intimidating. Making art to display in your home? Even more so.
Until now. Today, I’m here to guide you step by step through the process of play to make a large, display-worthy work of art, in the unique style ONLY you can.
First. A permission slip. A pep talk. A you-got-this high-five from this self-taught artist, designer, and teacher.
You were born to create. Each of us was. If you doubt this, look to any small child lost in imaginary play, inventing invisible friends, painting with cake all over their tray. We were born knowing how to play, imagine, build, and dream. And somewhere along the way, life, rules, and self-doubt crept in and most of us have forgotten the simple fact that creating is what we were born to do.
There is no right or wrong way to create. No rules as to the best way to make art.
Today (and always, if you are open to it) there is only fun, and play, and joy, and taking risks.
You will make marks that are UNIQUE to you. Embrace this. They are your magic. Your superpower. Your creative soul seeping out in color and shape form.
And. At the end of the day, if you don’t love what you made, start again tomorrow.

Some things you’ll need:
- Large paper – I like Canson Watercolor Paper in size 18″ x 24.”
- Paints – I prefer well-pigmented watercolor paints, especially if you’re new to painting.
- Brushes – Use what you have, but I love a 1″ flat brush and a size 6 or 8 round brush for this activity.
- Non-porous plate or palette for mixing colors
- Jar for water
- Scrap paper for testing colors
- Mark-making tools – Pencils, crayons, pastels—anything you have on hand that can add marks and texture to your work.
- Music – Creating is always best when done to a happy playlist IMO.
- Painter’s tape or masking tape
To get started:
Find a work surface.
I like a big, flat table surface to spread out all my materials and keep my paper flat.
Arrange your materials.
I’m a fan of working neat, meaning identifying a place for each of your materials as you go. My standard setup includes watercolors to my far right, my brush and water to the top of my paints, the mixing surface to the left of the paints, and scrap paper below the mixing surface. This setup allows me to get into the flow of grabbing water, adding paint, mixing it on my surface, and testing it on my scrap paper before I ever make a mark on my large piece.
Identify your colors.
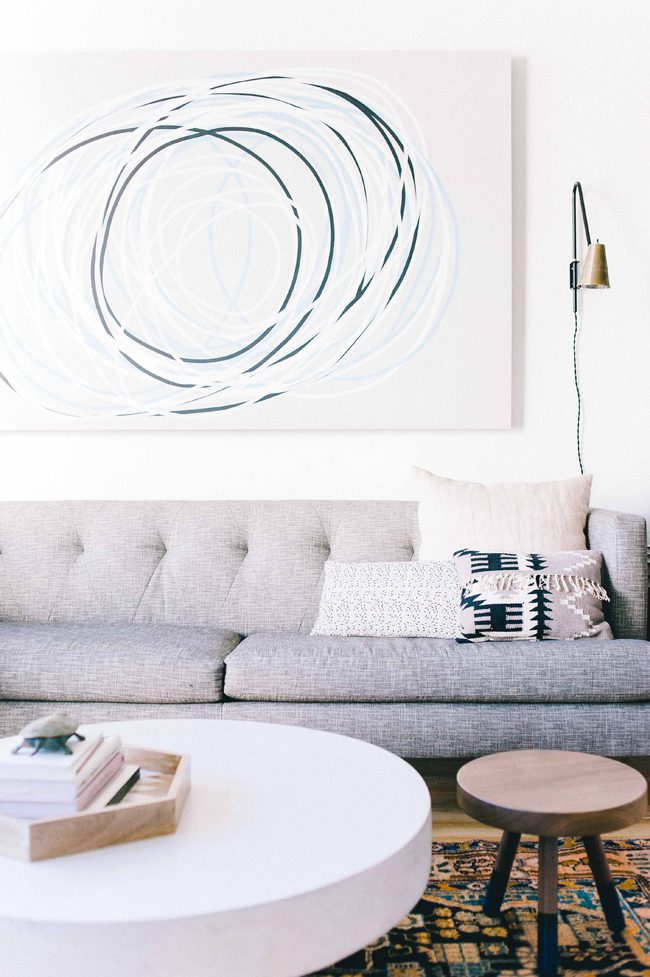
For a large-scale painting, I think it’s helpful to have some color inspiration as a starting point. It can be anything from the colors of a room you’re wanting to display your painting in, to an original piece of art you love, to a swoon-worthy image you’ve found on Pinterest or Instagram.
Mix and test your colors.
Once you’ve found a few points of reference for color, start to mix your colors to build your palette. Use your mixing surface to try out different hues from your paint set, and to even mix a few originals. Don’t forget to test each color on your scrap paper so you can see how it will look once applied to your original artwork.
Here, it’s helpful to work in about a 50% water/50% pigment mixture and mix more than you think you’ll need. Our canvas is quite large and will take a bit of paint to cover the entire area. While you can always mix more as you go, having enough on hand to start is a great way to ensure you stay in the zen of just painting.
Make some marks.
Now, you’re ready to paint! When working on a large scale, I find it helpful to use some structure (more info below!) to get the painting started. At some point, you’ll start to see what you like and where you need to push your work and can veer off and do your OWN thing.

To create your art, I suggest:
- Blocking some background shapes in large swaths of color. For this initial layer, you may want to use even more transparent tones of your palette by adding more water to the pigment. Keeping your first layer semi-transparent will give your painting depth and texture as you begin to build up layers of paint and marks. Cover most of the ground with big, odd shapes of color.
- Using your round brush, paint some large angular marks across the page. These could be stripes, diagonals, abstract rectangles, a stairway—whatever you feel. These should be big and a bit structured.
- Using your round brush, make some medium-sized round-ish marks. Ovals, dots, circles, swooping marks—whatever feels the most you.
- Grab your pencil/crayon/mark-making tool and start to add some small scribbles or detail lines on top of your paint marks. See what you can connect; what you can add dimension to.
- Add more layers, in bolder colors. What’s a color you haven’t used yet? Pick something a bit shocking (I’m always up for a small hit of neon at about this point) and make some small marks in one area of the page.
- Using your tape, mask off some bits of your painting (make sure the last layer is dry first). Grab your flat brush and make some big marks across the tape, leaving areas of relief.
- Remove the tape, once the paint has dried.
- Stand back. How does your painting look so far? More importantly, how do you FEEL about it? I’m hopeful you’re feeling a bit more ease, more flow, more joy, and calmer as you’ve stretched your creative muscle and made your marks!
- Keep going. Add more marks. Big, small, tonal, bold. You are in charge; just keep going until you like where you land.
- Let your work dry. You may have to do this throughout, taking breaks to let each layer dry so the colors don’t run together.
- Sign your work. Yes, seriously. Autograph it.
- Now do a happy dance. You made art. You made marks. You shared your magic with the world, in only the way YOU can.
- Frame your work.
- Hang your work.
- Visit your work often to connect you to your creative soul.
- Repeat as needed. Feel free to change out your original art to suit your mood, the seasons, or your latest color crush obsession.
Yay YOU! You made art. You took risks. You made a mess. You made some happy marks, and also some space for calm and play and fun in your day.
That, my friends, is the TRUE masterpiece. Taking some time to express your creativity. Bravely and beautifully.
Jill Elliott is an artist, wallpaper designer and writer constantly seeking inspiration and balance. You can find Jill’s wallpaper and original art at Color Kind Studio. She can often be found making art and messes alongside her daughter and puppy.
BY Jill Elliott - February 11, 2021
Most-read posts:
Did you know W&D now has a resource library of Printable Art, Templates, Freebies, and more?
take me there
Get Our Best W&D Resources
for designing a life well-lived


Thank you for being here. For being open to enjoying life’s simple pleasures and looking inward to understand yourself, your neighbors, and your fellow humans! I’m looking forward to chatting with you.
Hi, I'm Kate. Welcome to my happy place.


Thanks for the pep talk. Painting is always at the top of my why-am-I-not-doing-this? list. I always feel much more grounded when I sketch, and I don’t do that enough either. One question, though: You don’t mention soaking and stretching the paper. Can I skip that step? That would make the process much more spontaneous. And more likely to happen. Thanks again.
Hi Lori! Same, I am always more grounded when I sketch or paint…or anything creative. I do no soak or stretch the paper. I tape down the edges to work on a piece this large and find that if I let it dry taped down. That works and is much easier than soaking / stretching to keep me making! Happy Creating!