


Half of the square footage of our house lives in the basement. It’s one of the quirkier aspects of a very unique home, and an element that no doubt sent potential buyers looking in the other direction. We had the same pause when deciding if this house was right for us. We needed to also consider if the layout was going to work for our family and, potentially, as a workspace option for our Wit & Delight team.
The basement has potential. There’s plenty of character with the arches and brick walls, plus sizable rooms for recreation and work. When we moved in, there was also rough plumbing that made it clear there was a kitchenette in place previously, and we knew we could add a kitchenette to the space as well. Since the plumbing was already in place, it was a slightly easier project to tackle.
The design decisions we made all centered around moving the space away from dark, Olive Garden-esque area to something that might make you feel like you’re in the south of France. In this post, I’m going to walk you through each primary design element and the decision-making process behind it. At the bottom of the post, I’m sharing a price breakdown for each element, to help illustrate the overall cost of a project like this.
Without further ado, let’s get started.

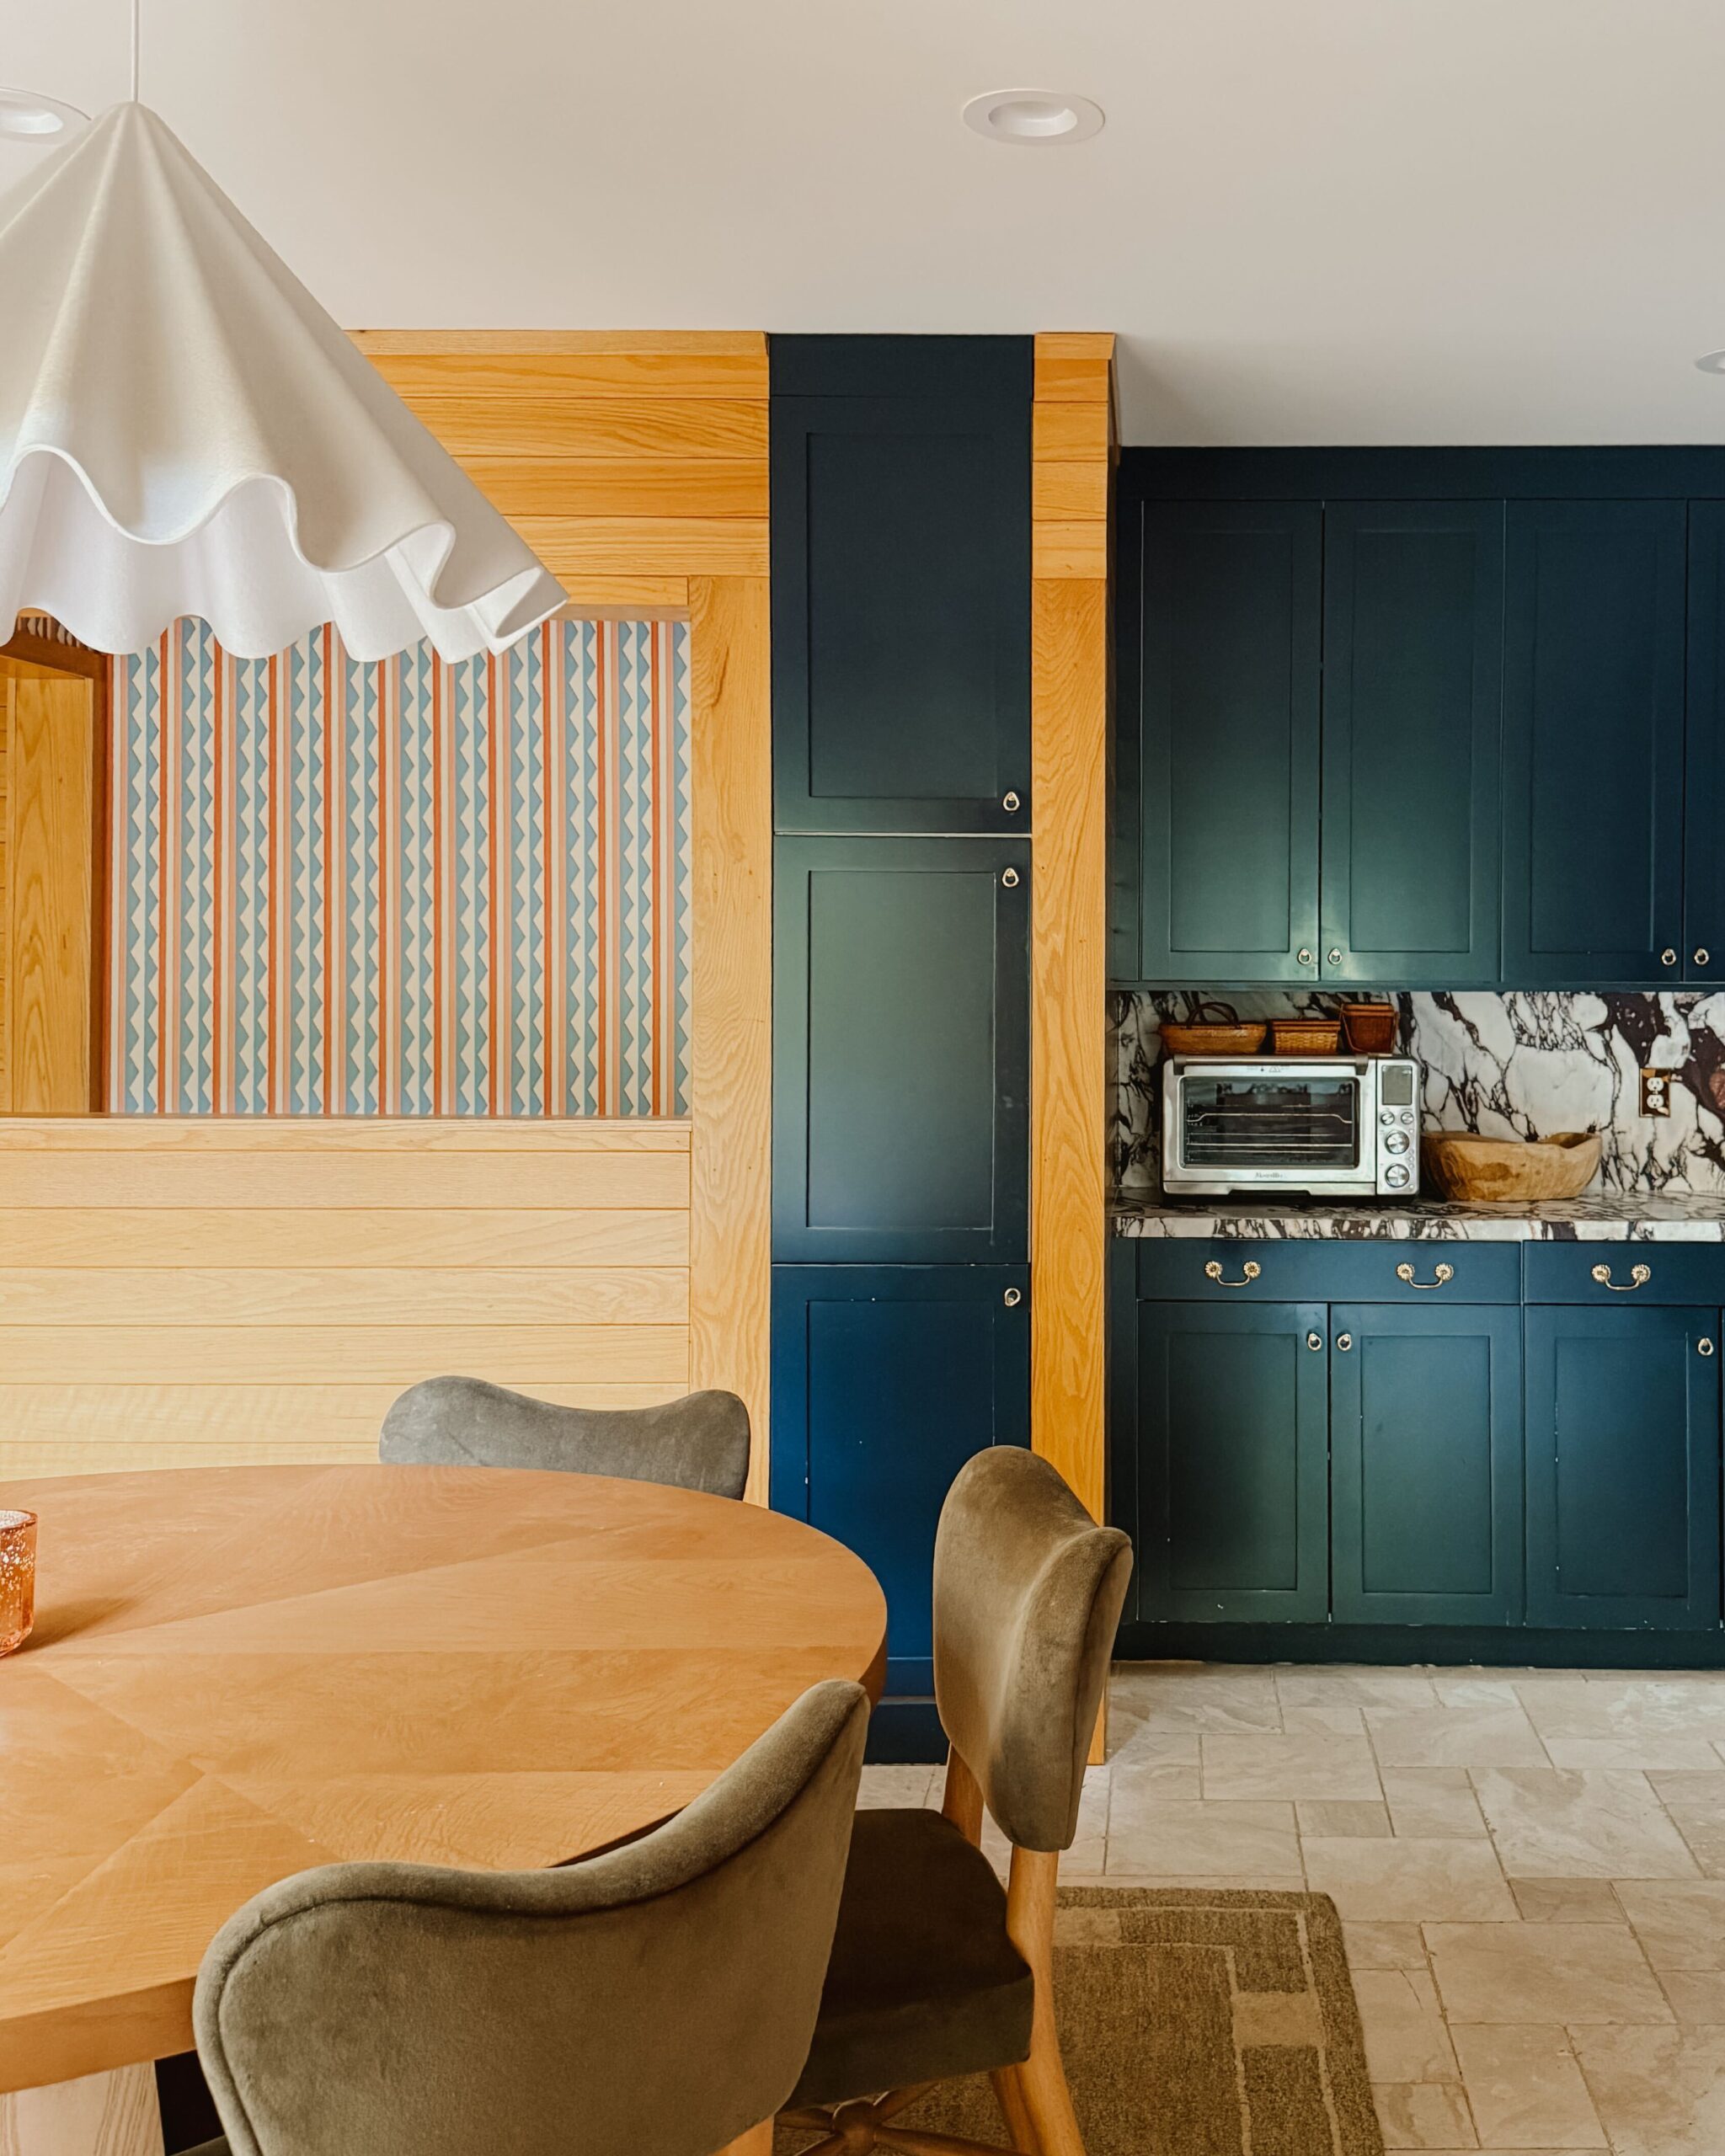
Floor Tile
The tile in this space was a big factor in making the property a real-life “love it or leave it” scenario. Before we bought the house, we decided we would keep the flooring and figure out how to work with it. Removing and replacing it would have been incredibly costly, which on its own was a very practical reason to keep it.
The space has no natural light and the orange in the tile can feel somewhat harsh; it’s definitely not for everyone. Even with the lack of natural light, there’s no reason why you can’t pull in elements that make the tile feel really at home. We focused on bringing in white elements throughout the area to balance out the warmth of the flooring and also the ceiling, which is a similar orange tone.

This kind of tile takes some extra care to install and needs to be resealed every couple of years. Each tile is different and we have found some little leaf imprints and even little paw prints from animals that walked across the tiles as they were formed. It’s organic and biodegradable and therefore an eco-friendly option, but you would want to factor in shipping if looking to minimize your carbon footprint while purchasing a product like this.
Cabinets
The cabinets are freestanding from the KNOXHULT modular kitchen line at IKEA. When we measured the space, I realized these cabinets fit perfectly, which made the installation process relatively seamless.
For now, we are using the countertops that come with this set. The feet of the cabinets are adjustable, which makes it a really good fit for the uneven tile in this space. Eventually, if we decide to spend more money in this space, we may consider creating custom cabinets (and these IKEA ones could move into our basement workroom), but for now, these work just fine.
We also added brass and leather pulls to the cabinets to bring in an additional, softer texture that works well in contrast to the hard tile.

Sink and Faucet
I decided to go with a brass faucet from IKEA that is no longer available on their website, but I love the sleek design. They are now offering it in a chrome finish, which is equally lovely. The Elkay sink is from Build.com and was a really affordable option (I got it on sale) that is deep enough to handle hand-washing a bunch of dishes. We added a sink cutting board which is a nice addition for small spaces.
Fridge
This Smeg fridge has been with us for years now, first at Studio 125 and now in the basement. We ultimately moved it to the far left side of the kitchenette to help open up the layout a bit. For those wondering about our thoughts on the product, it has held up great over the years. We have had no issues other than the freezer door being left open by guests at events (hardly an issue homeowners would have unless you have an unruly toddler…no judgment here). The size is definitely something to consider if you are wanting to buy it for your main fridge. It’s small, and probably a third the storage space of a 36” fridge. But oh how stylish it is!
Wallpaper
We needed to find a way to bring design elements from the main level down to the basement. The green and white wallpaper felt like a classic combo paired with the terracotta tile. It added visual interest and helped make the tile feel like something we may have selected on our own.
The wallpaper is a pattern but from far away it looks like a texture, which adds some visual interest to the kitchenette area without feeling overwhelming. We decided to continue the wallpaper in the laundry room and the adjacent hallway. I’m so pleased with the look this created!

The print we selected was gifted from Wallpaper Direct. The colorway we used is Pomona in green and orange from the Galerie Apelviken Wallpaper Collection.
Lighting
The track lights were so unique and cool that we decided to play into the existing feeling with another retro light from Schoolhouse Electric above the kitchenette sink that played off of that style. The style is Alabax Medium and we paired it with this bulb. The placement over the sink was perfect, and using a can light converter kit, we were able to easily install it with no additional electrical work needed.

Shelf
On its own, the shelf from West Elm felt a bit more rustic than I had expected it would. It felt visually heavy so we decided to paint it in a complementary color.
We used the same paint we used in our main bedroom (the paint color was a custom match but is similar to this color) because we had it on hand and it was a nice complement to the green in the wallpaper. In my experience, green can often feel like a neutral. It’s a color that brings a lot of life into a space and works with pretty much everything. It’s a nice design element that brings a much-needed hue to an otherwise somewhat monotone space.
Rug
We chose a plush rug in a postmodern-meets-traditional pattern from Annie Selke’s Dash & Albert line because it added tension, was soft underfoot, and worked within the space without feeling super matchy. This is one of my favorite rugs in the house, hands down! The floor in the kitchenette really needed something thick and cozy and this rug delivers.

Materials Cost Breakdown
To help inform any kitchen decisions you may be looking to make in the future, you’ll find the costs and links for each material below. I decided not to include the cost of labor, since it varies greatly and for a project of this size, most of the tasks could be done on your own without too much hassle.
Cabinets
- Cost: $299
- Source: IKEA
Cabinet Pulls
- Cost: $17/set of 4 | We used 2 sets for a total of $34
- Source: Amazon
Sink
- Cost: $60 | This item is listed for $197 but I purchased it on sale this past fall.
- Source: Elkay

Faucet
- Cost: $79
- Source: IKEA
Fridge (already owned)
- Cost: $2,999
- Source: Smeg
Wallpaper (gifted)
- Cost: $117/dbl roll | We used 3 rolls in the kitchenette for a total of $351.
- Source: Wallpaper Direct
Light
- Cost: $179 for the light + $26 for the bulb + $44 for the converter kit = $249
- Light Source: Schoolhouse
- Lightbulb Source: Schoolhouse
- Converter Kit Source: Schoolhouse
Shelf
- Cost: $160
- Source: West Elm
- Paint Color: Custom match, similar to this Farrow & Ball shade
Rug (gifted)
- Cost: $610
- Source: Annie Selke
Additional Decor Pieces
- IKEA Console Table: $300
- Elkay Cutting Board: $97
- Similar Print via Etsy: $15+ (digital print)
- Similar etúHOME Charcuterie Board: $140

Want more? Head to this post for a virtual tour of our updated basement kitchenette.
Editor’s Note: This article contains affiliate links. Wit & Delight uses affiliate links as a source of revenue to fund operations of the business and to be less dependent on branded content. Wit & Delight stands behind all product recommendations. Still have questions about these links or our process? Feel free to email us.

Kate is the founder of Wit & Delight. She is currently learning how to play tennis and is forever testing the boundaries of her creative muscle. Follow her on Instagram at @witanddelight_.
BY Kate Arends - March 25, 2021
Most-read posts:

Did you know W&D now has a resource library of Printable Art, Templates, Freebies, and more?
take me there
Get Our Best W&D Resources
for designing a life well-lived


Thank you for being here. For being open to enjoying life’s simple pleasures and looking inward to understand yourself, your neighbors, and your fellow humans! I’m looking forward to chatting with you.
Hi, I'm Kate. Welcome to my happy place.


Judy did amazing with these pics!;)
She really did!!
Really beautiful. I love that you left the tile and paneling and made it look gorgeous. I love the lights and the wallpaper. Moving the fridge was the right choice. Can’t wait to see what the rest of the basement will look like when you are done with it.
Thank you! We’ll definitely share more as we go…stay tuned!
I love seeing how you brought out the best in the tile! So pretty and unique. In the early design blogging days I’d see tile like that removed to put in espresso wood floors or something else trendy and it would be heartbreaking to watch.
Thanks for your comment! We’re glad we’ve been able to make it work for us in the space.
I love the wallpaper. Thanks for sharing the details of your decision making!
Absolutely, thanks for taking the time to read and comment!
Beautiful space!
Thank you!
Love it! And I have the exact same wicker lamp!
Thank you! It’s such a versatile little lamp!
The kitchen perfectly combines style and functionality. The tiles on the floor resemble a honeycomb of bees. Great idea!
You did a great job working with the tile and making it all look intentional. Very nice!
Thank you!!